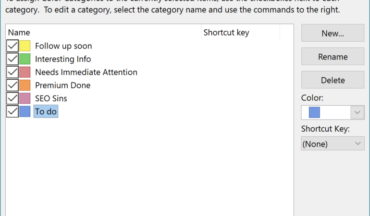
Color adds visibility to your desktop Outlook items. Color categories can be assigned to email messages in Microsoft Outlook, which enables you to quickly identify them and associate them with related items. This is especially helpful for those who do not use folders to sort emails. Categories can be renamed and additional ones can be created.
The directions below give steps to create a category to then place all emails, meetings/appointments and tasks from your supervisor in that category. The follow-up to this will create a rule to then automatically categorize these items as they arrive in the Inbox.
Notes: These steps are for those using Microsoft Outlook 2010 (not the Web App).
For calendar items, the Tags group appears on the Appointment or Meeting tab.
For an open contact or task, the Tags group appears on the Contact or Task tab.
Create a category
- On the Home tab, in the Tags group, click Categorize, and then click All Categories.
- Click New.
- In the Name box, type a name for the new color category. (“From Supervisor”)
- Click the arrow next to Color, click the color that you want (if a different color then the default is preferred).
- Click OK on the Add New Category and Color Categories dialog boxes.
Categorize an email, meeting /appointment or task
- Selected the item.
- On the Home tab, in the Tags group, click Categorize.
- Use the drop down arrow to select the category/color from the list.
Sort by category
- Select the folder to search from the left panel.
- On the Search tab in the Ribbon, click on More in Refine group.
- Click Categories.
- Use the drop down arrow to select the category.
- Use any other needed filters.
- Click the magnifying glass to begin the search; the results will be displayed in the area below the search criteria.
Rename a category
- Click the arrow next to Categorize (Home tab/Tags group).
- Click All Categories.
- Check the category name to be changed (entire name is highlighted).
- Click Rename.
- Type the preferred name.
- Click OK.

